Table of Contents
BUTT streaming software for audio streaming
Linux
1. Open qjackctl and start the jack server (start)

2. Open butt (install from website or ubuntu package repository)
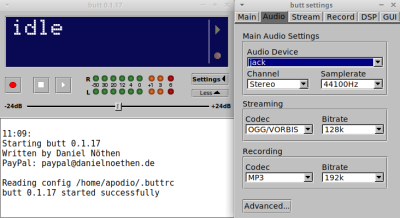
3. Change the audio device in the Audio tab to choose system (use under jack)
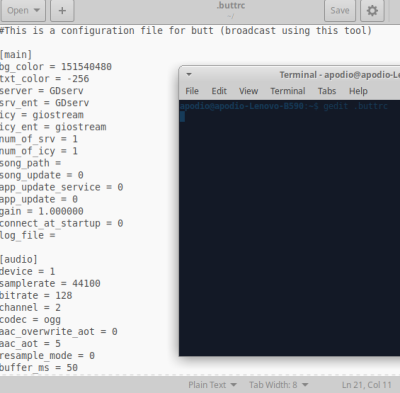
NB: Versions 0.1.17/0.1.18 have a bug when changing the audio device from default to system. If this bug occurs, you must open a gedit-type text editor with the /home/user/.buttrc file to change the default audio to the correct driver (for example 0=default / 4=system). Either choose default mp3 or put ogg/vorbis.Default=128kbs, if connection problems put 80kbs.
4. In the Main tab, click on ADD and fill in the server info:
→ address= serveurdestream
→ port= 8000
→ password= serverpassword
→ IceCast mountpoint = streamname
→ IceCast user = user1 (for example)

5. Click on the play button (connect to server), if all goes well we see on the connection window: Stream time and the progress of the stream time

6. To verify, go to the page http://monserveurdestream:8000 - you should see the name of your stream there.

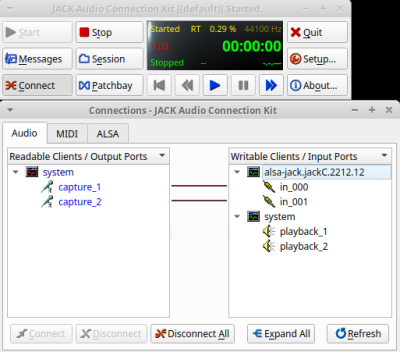
7. Connect your software or sound card in jack to the Audio Port inputs
Windows
First, download and install :
VB-CABLE (https://vb-audio.com/Cable/index.htm)
Voicemeeter Banana Lite (https://vb-audio.com/Voicemeeter/banana.htm)
Butt (https://sourceforge.net/projects/butt/)
(NB: The use of Voicemeeter Banana makes it possible to independently manage listening and sending to the stream.)
Then :
1. From Windows sound settings, set VoiceMeeter Input as the default output device.

2. In Voicemeeter, click at the top right on A1 next to HARDWARE OUT, then select the output device of the installation (headphones, sound card, speakers, etc.).
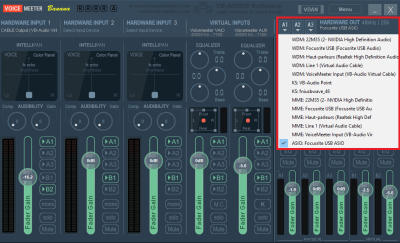
3. From the application generating the desired sound source, open the audio preferences/settings, then select CABLE INPUT as the output device.

4. In Voicemeeter, click at the top of the HARDWARE INPUT 1, 2 or 3 track, then select CABLE Output. Then, press the send button of the track to B2.

5. Launch Butt, click on Settings, then on the Audio tab. In Audio Device, select VoiceMeeter Aux Output.

6. Return to the Main tab, then add a server by pressing Add. Next :
→ Give a name to the server
→ Select IceCast type
→ Assign address, port and password
→ Give a name to the stream (IceCast mountpoint) and a name to the source (IceCast user), in order to facilitate its identification

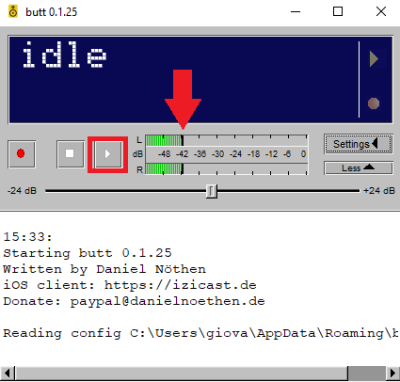
7. Check on the vu-meter that the sound source is well picked up by Butt. If yes, press the Play button to connect to the server.
NB: The stream is not started if Butt displays Connecting…!
NB: to add a second source to the stream, it is possible to install Virtual Audio Cable (https://vac.muzychenko.net/en/download.htm ). Then simply perform the same manipulation as with VB-CABLE, except that you will then have to select Line 1 in the software generating the sound source, and Output 1 in the VoiceMeeter track.
Tutoriel pour utiliser le logiciel de streaming audio BUTT
Sous Linux
1. Ouvrir qjackctl et démarrer le serveur jack (start)

2. Ouvrir butt (installer du site web ou dépôt paquet ubuntu)

3. Changer l’audio device dans l’onglet Audio pour choisir system (utilisation sous jack)
NB : Les versions 0.1.17/0.1.18 ont un bug au niveau du changement de l’audio device du default vers system. Si ce bug se présente, il faut ouvrir un éditeur de texte du type gedit avec le fichier /home/user/.buttrc pour changer le default audio par le bon driver (par exemple 0=defaut / 4=system). Soit choisir mp3 par défaut soit mettre ogg/vorbis. Défaut=128kbs, si soucis de connexion mettre 80kbs.

4. Dans l’onglet Main, cliquer sur ADD et remplir les infos serveur :
→ address= serveurdestream
→ port= 8000
→ password= serverpassword
→ IceCast mountpoint = streamname
→ IceCast user = user1 (par exemple)

5. Cliquer sur le bouton play (connect to server), si tout se passe bien on voit sur la fenêtre de connection : Stream time et le déroulé du temps de stream

6. Pour bien vérifier aller sur la page http://monserveurdestream:8000 - vous devriez y voir le nom de votre stream.

7. Connecter votre logiciel ou votre carte son dans jack vers le entrées de Port Audio

Sous Windows
Au préalable, télécharger et installer :
VB-CABLE (https://vb-audio.com/Cable/index.htm)
Voicemeeter Banana Lite (https://vb-audio.com/Voicemeeter/banana.htm)
Butt (https://sourceforge.net/projects/butt/)
(NB : L’utilisation de Voicemeeter Banana permet de gérer indépendamment l’écoute et les envois vers le stream.)
Ensuite :
1.Depuis les paramètres de son de windows, définir VoiceMeeter Input comme périphérique de sortie par défaut.

2.Dans Voicemeeter, cliquez en haut à droite sur A1 à côté de HARDWARE OUT, puis/ sélectionnez le périphérique de sortie de l’installation (casque, carte son, enceintes, etc.).

3. Depuis l’application générant la source sonore désirée, ouvrir les préférences/paramètres audio, puis sélectionner CABLE INPUT comme périphérique de sortie.

4. Dans Voicemeeter, cliquez en haut de la piste HARDWARE INPUT 1, 2 ou 3, puis sélectionnez CABLE Output. Ensuite, appuyer sur le bouton d’envoi de la piste vers B2.

5. Lancer Butt, cliquer sur Settings, puis sur l’onglet Audio. Dans Audio Device, sélectionner VoiceMeeter Aux Output.

6. Retourner sur l’onglet Main, puis ajouter un serveur en appuyant sur Add. Ensuite :
→ Donner un nom au serveur
→ Sélectionner le type IceCast
→ Attribuer une adresse, un port et un mot de passe
→ Donner un nom au stream (IceCast mountpoint) et un nom à la source (IceCast user), afin de faciliter son identification

7. Vérifier sur le vu-mètre que la source sonore est bien captée par Butt. Si oui, appuyer sur le bouton Play pour se connecter au serveur.
NB: Le stream n’est pas démarré si Butt affiche Connecting… !

NB : pour ajouter une deuxième source au stream, il est possible d’installer Virtual Audio Cable (https://vac.muzychenko.net/en/download.htm). Il suffit ensuite d’effectuer la même manipulation qu’avec VB-CABLE, sauf qu’il faudra alors sélectionner Line 1 dans le logiciel générant la source sonore, et Output 1 dans la piste de VoiceMeeter.